A Comprehensive Guide to Marketo Partition Setup and Management
Marketo Partition management is a critical aspect of optimizing marketing automation for any organization yet the information online tends to be scattered and often insufficient. This article aims to consolidate my research, which were confirmed through Marketo support, and provide a comprehensive understanding of Marketo Partition setup and management.
Note: For step-by-step instructions on setting up partitions and workspaces, please consult the official Marketo product documentation.
Partition Assignment Options
There are three setup options and the expected behavior for Partitions.
Option 1: Partition Settings in the Admin Interface
Applicable to: All newly created records, excluding those created via CRM sync or SOAP API.
Accessing the setting: Navigate to Admin > Workspaces and Partitions. Update the settings through the Workspace or the Partitions tab. The Workspace tab allows you to select a primary partition and assign a partition to a newly created workspace.
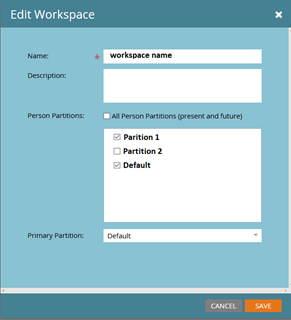
Functionality: Create all potential partitions within the "Partitions" tab. In the "Workspace" tab, create a workspace and enter its name and description. The remaining fields (outlined below) define the partition assignment rules.
-
This option allows a specific workspace to access all existing partitions within your instance, including any new partitions added in the future. This is useful for referencing all partitions in an "Operational" workspace.
-
This field lists all available partitions. Select the partitions to be accessible via the chosen workspace. If only one partition is selected, it automatically becomes the primary partition. At least one partition must be selected per workspace.
-
This field specifies the primary partition a record will be associated with if introduced to Marketo through an asset within the workspace (e.g., form fill out). If a workspace has access to multiple partitions, the default partition is denoted with an asterisk (*). If the workspace only has access to one partition, the asterisk does not appear.
Handling Duplicates
Duplicate records may arise under various circumstances. The expected behavior for handling duplicates is dependent on the source of lead creation.
Consider the subsequent scenario: Record X is exclusively present in Partition A. When attempting to add an identical email address to Partition B through any of the listed lead creation sources, anticipate the corresponding behavior as outlined below.
-
A new record with a duplicate email will be created in the designated partition. This record will be available for reference in all workspaces that have access to the partition.
-
A new record with a duplicate email will not be created in the partition unless custom duplication rules are established with Marketo support.
-
A new record with a duplicate email will not be created in the partition unless custom duplication rules for form fill outs are established with Marketo support.
-
A new record with the same email will be created within the specified partition if the partition name is defined within the REST API request.
Important Note: Please note that the scenarios discussed do not take into account any smart campaigns that may update partitions, as they solely refer to default settings. Furthermore, all mentioned scenarios depend on the creation activity occurring in a workspace where Partition B is set as the Primary Partition.
Custom duplication rules can be requested via Marketo Support for each lead creation source. For example, one can establish a rule that utilizes both the email address and primary partition as duplication criteria specifically for list imports. This would enable the creation of a new record (Y) with a duplicate email in Partition B via list upload, even if Record X already exists within Partition A.
It is highly recommended that you thoroughly examine and comprehend the use case, functionality, and activity tracking for various scenarios before requesting a custom duplicate rule, particularly for Form Fill Outs. Bear in mind that creating a new record with a duplicate email address confines all associated activity to the workspaces where the partition is made available. In cases where both records are accessible in a single workspace (e.g., operational), it is crucial to understand and consider the attribution of activity (emails, web, etc.) within the shared workspace.
Option 2: Assignment Rules in the Admin Interface
Applicable to: All newly created contacts or leads via CRM sync or SOAP API.
Accessing the setting: Navigate to Admin > Workspaces and Partitions > Person Partitions Tab > Click Assignment Rules
Functionality: The default value will be the initial partition the contact is assigned to if being synced from the CRM. Basic logic can be applied, or a partition can be assigned via a smart campaign if the add choice functionality is insufficient for your business
Option 3: Smart Campaign in Marketing Activities
Applicable to: This feature applies to both newly created and existing records. For instance, if the partition assignment logic for CRM sync is overly complex and necessitates a combination of filters, this functionality can be employed to update the partition from its default state.
Note: Smart Campaign partition rules possess the capability to override rules assigned through partition settings in the admin tab. It is crucial to ensure that the smart campaign logic is thoroughly tested and essential for your specific use case before implementation.
Accessing the setting: To access this setting, establish a campaign within the Operational workspace (which provides access to all partitions). Then, create a smart campaign within Marketing Activities. Within the flow, select the "Change Person Partition" flow step.
Functionality: Conditional logic can be applied within the smart list of the smart campaign, necessitating multiple campaigns. Alternatively, you can create bucketed smart list assets that can be referenced within the "add choice" flow step of a single smart campaign. Depending on your business requirements, the campaign can be set as either triggered or batch-based.
Enjoyed this blog? Elevate your marketing efforts – schedule a consultation today!


